Management
Management

Management enables you to manage your reports library.
The following sub-menus group the management console:

Menu |
Summary |
Save |
Save a created report definition to the database so it can be run at a later date and time. |
Library Details |
Contains all reports you have saved. You can open one of your reports by double-clicking the report id in the first column. |
Report Folders |
Allows you to organise your reports into folders. Also allows you to schedule reports for running at a later time, and to run them at regular intervals. |
My Scheduled Reports |
Displays reports which are scheduled to run later, and allow you to cancel a scheduled report. |
Delete Selected Report |
Allows deletion of reports in tabs where they are displayed. |
Apply Report Settings |
Allows a report to be loaded without loading data. |
Saving your report definition
This allows you to save the current report definition as a named report.
OLAP Report Name : {enter a meaningful name for your report}
Excel Worksheet Name : {enter a worksheet name} This will appear as the sheet name when you export your report to Excel.
Click the Save button.
![]()
An important aspect of saving Reports in myObjectiveOLAP is that they are saved without data. Reports are saved in an OLAP workspace. Each time you open or run a report, it will be populated with the current data (as at the time you logged in or Refreshed Data - see below).
The panel below the Save button provides a technical report on details of the saved report (this can sometimes be useful for support purposes). The final line of the Output will display the assigned Report ID when saving a report:
Report Saved Successfully. Report ID: 1389257738
Library Details
This provides a list of your reports, displayed in tabular format with the following columns:

You can sort the list of reports by any of the columns by clicking on the column name tile. Click again to reverse the sort order.
To run a report, double-click on the Report ID. This is affected by the Apply Report Settings check-box. If the box is checked, the report definition is loaded but the report is not run. This allows you to modify the report before running it.
To delete a report, highlight the Report ID and click the Delete Selected Report button above the column titles. You will be asked to verify your intention to delete the report.
Report Folders
Your report library can be organised into folders to enable you to manage them more easily.

The list of reports is presented in a hierarchical format, arranged into folders that you can create according to your requirements.
The following mini Ribbon menu options are available:

Ribbon Item |
Summary |
New Folder |
Create a new folder. Highlight the place where you want to create the folder (Library, or another folder), and click the New Folder Tab. The dialog box requests a folder name |
Delete |
Delete a report or folder Highlight the report or folder for deletion and click the Delete button. |
Refresh |
Refresh the library from the database |
Run Report |
Run the selected report |
Scheduled Reports
You can schedule a report to run at a later time, or at intervals. Highlight the Report ID in the Library hierarchy. The fields in the schedule panel will then be available

Click on the field marked ‘Schedule a report to run at a later time’ to open a Graphical Date/Time selector tool. Select a future date and time.
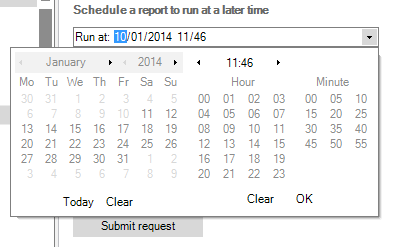
If you wish to run your report at repeating intervals, click the Recurring button so that it displays ON.

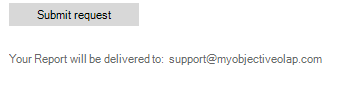
Then click on the ‘Run Until … ’ field to choose an end Date and Time. Select the Frequency in Hours, Days or Weeks. When you are happy with your settings, click Submit Request. Your scheduled report will appear in the table below.
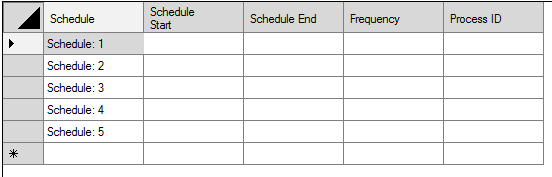
Each report can be scheduled with up to five schedule slots.
Your report will be emailed to the email address shown below the Submit Request button. This is the email address which has been defined by your myObjectiveOLAP Server administrator and cannot be changed by the end-user.
If you want to delete a scheduled report, right-click on the row in the table and choose ‘Stop Scheduled Report’.
My Scheduled Reports

My Scheduled Reports lists all reports scheduled under your user ID. Right-clicking on an individual scheduled report allows you to stop an individual report schedule.

When using the Library Details or the Report Folders, you can delete a report by highlighting the report name and clicking on the Delete Selected Report button. A dialog box will ask you to verify your intention.
Apply Report Settings check-box

In Library Details you can run a report by double-clicking on the report ID. In Report Folders, you can run a report by highlighting the report and clicking the Run button.
In either case, if the Apply Report Setting box is checked, the report will be loaded but the report will not be run. This sets the selections of dimensions and other report choices, but does not load new data from the OLAP workspace.
This work area provides OLAP DML command lists, mainly of interest to developers.